Saturday, December 7, 2013

Java Web App with Spring annotations, programmatic web.xml, programmatic application context and a scheduler

Create a new Maven Project with Eclipse

Make sure to flip the packaging to war


Add the following dependencies to your pom


Create the programmatic web.xml. I called mine WebInit.java(you can call it anything you want)
and stuck it in a package called "conf" under src/main/java

I also created a index.html file just to make sure I can deploy the app at this point and that WebInit kicks in.

Create the programmatic Spring Application Context. I did mine under the same "conf" package and called it SpringAppContext(you can call it anything you want)


Now we have to nudge Spring at app start-up and tell it to start wiring things up - creating beans, injecting and stuff (this is very technical language...thank you!)
So we add the following magic to the programmatic web.xml(WebInit.java in my case):


At this point we redeploy to test:
Search for "testBean" in the console - should be on line indicating it was instantiated by Spring - if that is the case, life is good!

INFO: Pre-instantiating singletons in org.springframework.beans.factory.support.DefaultListableBeanFactory@7baa3dd: defining beans [org.springframework.context.annotation.internalConfigurationAnnotationProcessor,org.springframework.context.annotation.internalAutowiredAnnotationProcessor,org.springframework.context.annotation.internalRequiredAnnotationProcessor,org.springframework.context.annotation.internalCommonAnnotationProcessor,springAppContext,org.springframework.context.annotation.ConfigurationClassPostProcessor.importAwareProcessor,testBean]; root of factory hierarchy
Dec 07, 2013 8:14:47 PM org.springframework.web.context.ContextLoader initWebApplicationContext
INFO: Root WebApplicationContext: initialization completed in 423 ms

Now we do some coding

We create a Service class that would be invoked to do some work from the scheduled job


Then we create the Scheduled Job and Autowire the Service into it:


Now we just have to tell Spring where to look for "@Component"s and also that we want to do scheduling stuff,
so we add these two to our SpringAppContext.java:

@EnableScheduling
@ComponentScan(basePackages= {"app"})

"app" is just the name of my base package. For you it would be whatever package you placed your "@Component"s at.

This what the final version of the SpringAppContext.java looks like:


At this point we can deploy and test the complete web app.


And here is a zip of the project: webapp-scheduled

Hope this is useful!

Sunday, September 9, 2012

Simple Spring Quartz Web App with Maven and Eclipse

Update: 08/03/2016 - There is much easier way these days to quickly set up a scheduled process in your Java/Spring app - checkout the "@Scheduled" Spring annotation. The steps below could still be of help to you, if you are stuck with an older Spring version, which does not support the @Scheduled annotation.

1. Create a Maven Web App project with Eclipse

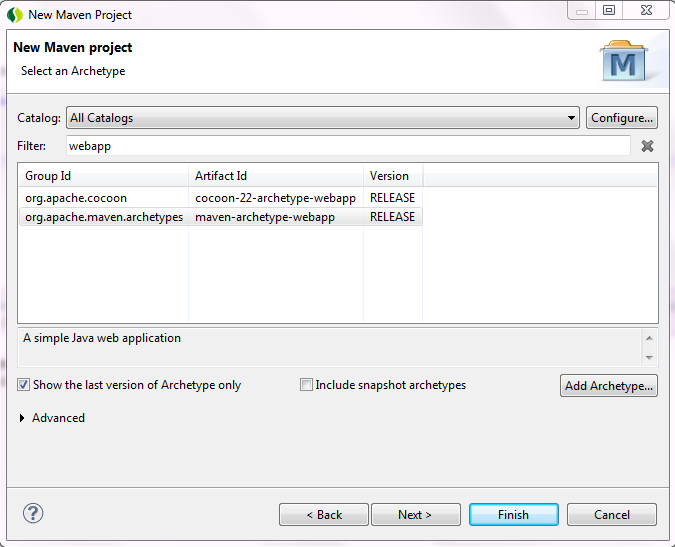
File -> New -> Project -> Other -> Maven Project ->


Next -> Next ->

You should be at the Select Archtype Screen.


Type "webapp" (without the quotes) in the "filter" textbox.
Select the archtype with group Id: org.apache.maven.archtypes
and artifact id: maven-archtype-webapp.

Next -> Type whatever floats your boat for you Group Id and Artifact Id on the next screen:


-> Finish

2. Add needed dependencies to pom.xml. 


You are going to need all the listed dependencies, here is my pom:

<project xmlns="http://maven.apache.org/POM/4.0.0" xmlns:xsi="http://www.w3.org/2001/XMLSchema-instance"
  xsi:schemaLocation="http://maven.apache.org/POM/4.0.0 http://maven.apache.org/maven-v4_0_0.xsd">
  <modelVersion>4.0.0</modelVersion>
  <groupId>boyko</groupId>
  <artifactId>batch-example</artifactId>
  <packaging>war</packaging>
  <version>0.0.1-SNAPSHOT</version>
  <name>batch-example Maven Webapp</name>
  <url>http://maven.apache.org</url>
<dependencies>
<dependency>
<groupId>org.opensymphony.quartz</groupId>
<artifactId>quartz</artifactId>
<version>1.6.1</version>
</dependency>
<dependency>
<groupId>org.springframework</groupId>
<artifactId>spring-context</artifactId>
<version>3.1.1.RELEASE</version>
</dependency>
<dependency>
<groupId>org.springframework</groupId>
<artifactId>spring-context-support</artifactId>
<version>3.1.1.RELEASE</version>
</dependency>
<dependency>
<groupId>org.springframework</groupId>
<artifactId>spring-web</artifactId>
<version>3.1.1.RELEASE</version>
</dependency>
<dependency>
<groupId>org.springframework</groupId>
<artifactId>spring-tx</artifactId>
<version>3.1.1.RELEASE</version>
</dependency>
      <dependency>
          <groupId>commons-collections</groupId>
          <artifactId>commons-collections</artifactId>
          <version>3.2.1</version>
      </dependency>
</dependencies>
  <build>
    <finalName>batch-example</finalName>
  </build>
</project>

3. Add Spring to your web app.

Add Spring's ContextLoaderListener and the contextConfigLocation to web.xml.


This is my web.xml:

<!DOCTYPE web-app PUBLIC
 "-//Sun Microsystems, Inc.//DTD Web Application 2.3//EN"
 "http://java.sun.com/dtd/web-app_2_3.dtd" >

<web-app>
  <display-name>Archetype Created Web Application</display-name>

<context-param>
<param-name>contextConfigLocation</param-name>
<param-value>classpath:applicationContext.xml</param-value>
</context-param>

<listener>
<listener-class>org.springframework.web.context.ContextLoaderListener</listener-class>
</listener>

</web-app>

4. Create applicationContext.xml under src/main/resources

Right click on the project -> New -> Other -> XML file


5. Create src/main/java source folder

Right click on the project -> New -> Other -> Source Folder

6. Create the job

   Create a package under src/main/java
 
   Create a class that would be your Spring Batch job.


   Here is what mine looks like:
    

package boyko;

import java.text.DateFormat;
import java.text.SimpleDateFormat;

public class SampleJob {

public void sampleJobMethod() {

DateFormat dateFormat = new SimpleDateFormat("dd/MM/yyyy hh:mm:ss");

System.out.println("Invoked on " + dateFormat.format(System.currentTimeMillis()));
}
}


7. Add all needed configuration in applicationContext.xml

The final version of my specific applicationContext.xml is at the end of this section, but here are the additions step-by-step

7.1. Add the Job

<bean id="sampleJob" class="boyko.SampleJob" />

7.2. Create a Job Spring Quartz Bean and associate it with the Job and the Job method


<bean id="sampleJobBean"
class="org.springframework.scheduling.quartz.MethodInvokingJobDetailFactoryBean">
<property name="targetObject" ref="sampleJob" />
<property name="targetMethod" value="sampleJobMethod" />
</bean>

7.3. Create a trigger

<bean id="sampleJobTrigger" class="org.springframework.scheduling.quartz.SimpleTriggerBean">
<property name="jobDetail" ref="sampleJobBean" />
<property name="repeatInterval" value="10000" />
<property name="startDelay" value="3000" />
</bean>

7.4. Create a scheduler and associate it with the Job Bean and the Trigger

<bean class="org.springframework.scheduling.quartz.SchedulerFactoryBean">
<property name="jobDetails">
<list>
<ref bean="sampleJobBean" />
</list>
</property>
<property name="triggers">
<list>
<ref bean="sampleJobTrigger" />
</list>
</property>
</bean>

The numbers in trigger mean that the job will run for first time 3 seconds after app starts, then it will run every 10 seconds.

Here is the entire applicationContext.xml:

<?xml version="1.0" encoding="UTF-8"?>
<beans xmlns="http://www.springframework.org/schema/beans"
xmlns:xsi="http://www.w3.org/2001/XMLSchema-instance"
xsi:schemaLocation="http://www.springframework.org/schema/beans http://www.springframework.org/schema/beans/spring-beans-3.1.xsd">

<bean id="sampleJob" class="boyko.SampleJob" />

<bean id="sampleJobBean"
class="org.springframework.scheduling.quartz.MethodInvokingJobDetailFactoryBean">
<property name="targetObject" ref="sampleJob" />
<property name="targetMethod" value="sampleJobMethod" />
</bean>

<bean id="sampleJobTrigger" class="org.springframework.scheduling.quartz.SimpleTriggerBean">
<property name="jobDetail" ref="sampleJobBean" />
<property name="repeatInterval" value="10000" />
<property name="startDelay" value="3000" />
</bean>

<bean class="org.springframework.scheduling.quartz.SchedulerFactoryBean">
<property name="jobDetails">
<list>
<ref bean="sampleJobBean" />
</list>
</property>
<property name="triggers">
<list>
<ref bean="sampleJobTrigger" />
</list>
</property>
</bean>

</beans>

That should be that.

Run it on whatever server you prefer( I run on Tomcat 7 - right click on project -> Run On Server -> Tomcat 7) and you should see the sysouts in the console:


Attached is the sample. You could import it as an eclipse project after you unzip it and give a try on your own.

boyko-spring-batch-example

And here is an identical example which uses Cron Trigger and JobDetailBean:

boyko-cron-jobDetailBean-example


Update:12-11-2013: There's a better way to do a scheduled job these days. Use the @Scheduled annotation.

Friday, May 11, 2012

Working on one of our Grails apps I got "could not execute query; SQL [select contrac0_.contract_hrs as col_0_0_ from contract contrac0_ ]; nested exception is org.hibernate.exception.SQLGrammarException: could not execute query". I got the exception while running an integration test against the Service class executing the above query.
Farther down the stack there was also "Caused by: java.sql.SQLException: Table not found in statement [select top ? contrac1_.contract_hrs as col_0_0_ from contract contract0_]"

We are using Oracle and the specific domain class had a field defined as Double, but it also had 'sqlType' for the field specified as 'NUMBER(7,2)' to match up with the DDL for the table and to get around the dbCreate set to validate in our DataSource.groovy.

class Contract {
      Double contract_hrs

    static mapping ={
        contract_hrs column: "contract_hours", sqlType: "NUMBER(7,2)"
    }
}

To take care of the test, we had to take out the sqlType out.

Fixing the test this way though, made the application not run. At application startup we started getting an error message saying something along the lines of "expected double, but found integer" for the the contract_hours field(column).

The way to get around that was to change the dbCreate in DataSource.groovy from "validate" to "none".

Hope this helps someone!

Tuesday, April 3, 2012

zip by latitude and longitude with geonames and groovy

The titles says it. Geonames is publicly available RESTful web services provider. One of the services is findNearbyPostalCodesJSON. You give it a latitude and longitude and it gives you back a list of zip codes in JSON format. Try it for my neck of the woods:
 http://ws.geonames.org/findNearbyPostalCodesJSON?formatted=true&lat=39.998&lng=-82.8841

The gotcha is that you can make only up to 2000 service calls per day, after that you are asked to pay and service does not give you back your so desired zip codes.

And here is how we can do it with groovy and HTTPBuilder. You are going to need the following dependencies, assuming a maven project:


<dependency>
<groupId>commons-cli</groupId>
<artifactId>commons-cli</artifactId>
<version>1.1</version>
</dependency>
<dependency>
  <groupId>org.codehaus.groovy.modules.http-builder</groupId>
  <artifactId>http-builder</artifactId>
  <version>0.5.2</version>
</dependency>


And the code:

def http = new HTTPBuilder( 'http://ws.geonames.org' )
http.request( GET, JSON ) {
uri.path = '/findNearbyPostalCodesJSON'
uri.query = [ formatted: true, lat: 39.998, lng: -82.8841 ]
response.success = { resp, json ->
   
   println json
   return json.postalCodes[0].postalCode
 }
 response.failure = { resp ->
 
   log.error("Unexpected error: ${resp.status} : ${resp.statusLine.reasonPhrase}")
   return ""
 }

Hope this is helpful to someone some day.

Cheers!

Sunday, January 8, 2012

Set up ShemaSpy

There shouldn't be any argument that understanding data in your application is important. One tool I have found incredibly valuable in helping me understand database relationships is ShemaSpy. There was already a Hudson job set up on project when I rolled in, so I wouldn't credit myself with discovering SchemaSpy(I guess the credit should go to Paul Mazak), but assuming you already have JAVA installed on your Windows machine to set up SchemaSpy:

1. Download the latest SchemaSpy jar:
http://sourceforge.net/projects/schemaspy/files/

In my case the jar was schemaSpy_5.0.0.jar I saved it as C:\SchemaSpy\schemaSpy_5.0.0.jar

2. Download the latest version of graphviz
http://www.graphviz.org/Download.php

It looks like this one only comes with a msi installer. I'm pretty sure they had a binary at one point, but no longer the case, I guess..

In my case I installed GraphViz to C:\GraphViz_2.28

3. Ensure GraphViz was added to the PATH Environment System variable

In my case the msi installer did append C:\Graphviz_2.28\bin to the PATH

5. Copy to the SchemaSpy directory any jars with the driver that you'd need to connect to your database of choice


In my case since I am going against MySQL so I placed the mysql-connector-java-5.1.13-bin.jar in  C:\SchemaSpy

6. Run SchemaSpy
    Open command prompt and cd to the directory of the SchemaSpy jar
    Run:

java -jar schemaSpy_5.0.0.jar -dp mysql-connector-java-5.1.13-bin.jar -gv "C:\Graphviz_2.28" -hq -t mysql -db my_database_name -host localhost -u my_username -p my_password -o C:\SchemaSpy

7. Open and enjoy the generated graphics

Go to the directory you specified with the -o option of the previous command.
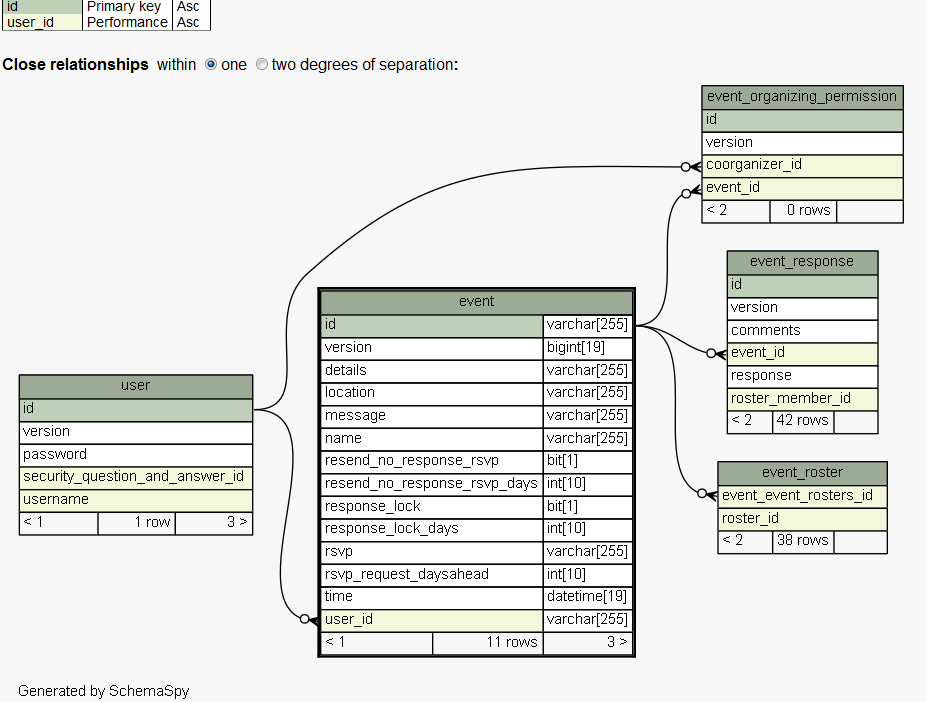
There should be an index.html file there, click on it and ...voila you have graphical representation of your database and its relationships.


Hope this helps someone!


Tuesday, December 27, 2011

Host 'somehost' is not allowed to connect to this MySQL server

Another one I have to keep rediscovering, so I decided to just document it and know where to look for it.
Trying to connect remotely to the MySQL instance of my Virtual Linux node I got the
"Host 'cpe-76-181-242-18.columbus.res.rr.com' is not allowed to connect to this MySQL server".

Solution was to log in to mysql as a root and create that particular user for that particular hostname:

mysql -u<yourRootId> -p<password>;


CREATE USER 'someuser'@'cpe-76-181-242-18.columbus.res.rr.com' IDENTIFIED BY 'some_P@ssw0rd';
GRANT ALL PRIVILEGES ON *.* TO 'someuser'@'cpe-76-181-242-18.columbus.res.rr.com';

In some cases you may have to also do

flush privileges;


for the changes to take effect.

Hope this helps someone. Cheers!

P.S. No worries, the hostnames are made up.

Tuesday, December 13, 2011

Spring + Quartz step-by-step

Update: 08/03/2016 - There is much easier way these days to quickly set up a scheduled process in your Java/Spring app - checkout the "@Scheduled" Spring annotation. The steps below could still be of help to you, if you are stuck with an older Spring version, which does not support the @Scheduled annotation.

I often end up spending prohibitive amount of time on tasks which I have completed in the past. One such task is setting up batch job with Spring and Quartz. Here is a step-by-step for my own sake or for anyone's else's sake:
The scenario is to have a job that periodically polls blogs for new blog entries. I assume a maven project.

1. Code up your job:

package com.qsi.template.util;


import java.net.URL;
import java.util.Arrays;

import com.sun.syndication.feed.synd.SyndEntry;
import com.sun.syndication.feed.synd.SyndFeed;
import com.sun.syndication.feed.synd.SyndEntryImpl;
import com.sun.syndication.io.SyndFeedInput;
import com.sun.syndication.io.XmlReader;

public class FeedReader {
String [] feedsUrls = new String [] { "http://boyko11.blogspot.com/feeds/posts/default" };
    public void readFeeds() {
    for (String feedUrlAsString: Arrays.asList(feedsUrls)) {
       try {
           URL feedUrl = new URL(feedUrlAsString);
           SyndFeedInput input = new SyndFeedInput();
           SyndFeed feed = input.build(new XmlReader(feedUrl));
           SyndEntry mostRecentEntry = (SyndEntryImpl) feed.getEntries().get(0);
           System.out.println("title: " + mostRecentEntry.getTitle());
           System.out.println("author: " + mostRecentEntry.getAuthor());
           System.out.println("date: " +  mostRecentEntry.getPublishedDate());
           System.out.println("link: " + mostRecentEntry.getLink());
       }
       catch (Exception ex) {
           ex.printStackTrace();
           System.out.println("ERROR: "+ex.getMessage());
       }
   }
}
}

I am using Rome for RSS reading :http://java.net/projects/rome/

2. Add dependencies to pom.xml


<dependency>
   <groupId>org.opensymphony.quartz</groupId>
   <artifactId>quartz</artifactId>
   <version>${quartz.version}</version>
</dependency>
        <dependency>
                   <groupId>org.springframework</groupId>
                   <artifactId>spring-context</artifactId>
                  <version>${spring.version}</version>
        </dependency>
<dependency>
   <groupId>org.springframework</groupId>
   <artifactId>spring-context-support</artifactId>
   <version>${spring.version}</version>
</dependency>

3. Add the job to your Spring config file(in my case applicationContext.xml)

<bean id="feedReader" class="com.qsi.template.util.FeedReader" />


<bean id="feedReaderJob"     class="org.springframework.scheduling.quartz.MethodInvokingJobDetailFactoryBean">
<property name="targetObject" ref="feedReader" />
<property name="targetMethod" value="readFeeds" />
</bean>


4. Add a trigger to you Spring config file


<bean id="simpleTrigger" class="org.springframework.scheduling.quartz.SimpleTriggerBean">

<property name="jobDetail" ref="feedReaderJob" />
<property name="repeatInterval" value="10000" />
<property name="startDelay" value="3000" />

</bean>

This job will trigger 3 seconds after the app starts and will run every 10 seconds

5. Add Scheduler to your Spring config file


<bean class="org.springframework.scheduling.quartz.SchedulerFactoryBean">

<property name="jobDetails">
<list>
<ref bean="feedReaderJob" />
</list>
</property>

<property name="triggers">
<list>
<ref bean="simpleTrigger" />
</list>
</property>
</bean>

That should be it.

Credits:
http://www.mkyong.com/spring/spring-quartz-scheduler-example/

The mkyong example also has an example with the CronTriggerBean which might be more desirable to use in your actual production apps.

Hope this helps someone! Cheers!

Update: Since this example lacks context, I added an web app example:
web app example

Update: 12-11-2013: There's a better way to do a scheduled job these days. Use the @Scheduled annotation.