Monday, April 25, 2022

Loki returns no data, although there is data

 In a multi-tenant system, You'd have to specify the org-id as "undefined", or no data will come back:

    logcli --org-id="undefined" query '{your_label="your_label_value"}'


If you are using the HTTP API, you'd have to set the

X-Scope-OrgID header to "undefined". Screenshot from my Chrome's ModHeader:


Credit: Tyler Owen


Loki logcli Error response from server: no org id

Problem:

On my Mac:

    export LOKI_ADDR=the_url_of_the_loki_server 

    logcli labels

    Error response from server: no org id


Solution:

    logcli --org-id="the_tenant_id_in_a_multitenant_system" labels

Wednesday, October 18, 2017

    I found myself in a situation where the same exact query ran much slower in our MySQL replication(slave) node compared to the primary(master) node. Both nodes had identical configuration, both were running the same version of MySQL, the tables and the indexes which the query ran against were also identical. Running explain through MySQL Workbench told me that the index that was making the query fast on the primary node, was not being used by the optimizer on the replica node. Hinting the query to use that particular index did improve the query speed on the replica node. But why did I have to hint? I knew with certainty there was a similar performance discrepancy for at least two other queries in my app.
    Jared Call, a colleague of mine, found that there was hung query on the replica node, by running
show processlist . The query was running for a number of days. He proceeded to kill the query:
https://stackoverflow.com/a/3787661/2948202
As soon as I learned about this, I ran my query against the replica, hoping that my problem would have been solved. Indeed, the query ran 5 seconds faster, but it was still slow - it took close to 7 seconds, while it was only a second on the primary node.
    Next Day: I tried on the replica node again and BOOM!!! - the query ran just as fast on replica as it ran on the primary. My guess is that this hung long running query was preventing any new records from being indexed, which made the query optimizer...not optimal. Once the hung query died, MySQL started indexing again and eventually caught up. This is my hand wavy theory as I am not a db admin pro.
   Tl;DR - if you have a query that MySQL doesn't seem to optimize correctly, check for any hung queries and kill them(as long as you know what you are doing). Then sit back and relax while MySQL catches up indexing.

Credits: Jared Call, Kelly Shutt, Eric Griffin, Nathan Wakefield, stackoverflow.com

Friday, March 28, 2014

Set a private field on a class you need to Unit Test

Well, of course, you could make your field with default access, or you can add some boilerplate setter, or you could fancy whipping up a utility using reflection, but spring-test has already thought of that.

Let's say you want to test your DonkeyController:

This is how you can easily set the private field donkeyDAO, without changes in the class under test:

ReflectionTestUtils is in spring-test:

Cheers!

Saturday, January 25, 2014

Spring MVC Json Rest Service Authentication Example

Just a quick example of using simple username/password authentication for a Spring RestTemplate Client-> Spring MVC Rest JSON service.

The idea is:
  1. Client fires a http request using Spring's RestTemplate
  2. The request is intercepted on the client side by Spring's ClientHttpRequestInterceptor
  3. The interceptor adds authentication headers to the http request before passing it on to the server
  4. The server side has a javax.servlet.Filter which looks at the request headers
  5. If the filter finds the headers injected by the client's interceptor and the header's values are correct (username/password correct) - the filter passes the request onto the server side logic for regular processing (chain.doFilter)
  6. If the Filter does not find the http headers or they have incorrect values, the filter writes "Unauthorized" to the http response.
I run it in tomcat through eclipse. To fire the requests through the client,  I just run the client(com.app.client.RestDonkeyClient)  within the same project by right-clinking on it and 'Run As -> Java Application. Both, service and client are in the same project for convenience.

https://github.com/boyko11/spring-rest-authenticate

References:
http://www.jeenisoftware.com/spring-3-mvc-json-example/
http://svenfila.wordpress.com/2012/01/05/resttemplate-with-custom-http-headers/


Saturday, December 7, 2013

Java Web App with Spring annotations, programmatic web.xml, programmatic application context and a scheduler

Create a new Maven Project with Eclipse

Make sure to flip the packaging to war


Add the following dependencies to your pom


Create the programmatic web.xml. I called mine WebInit.java(you can call it anything you want)
and stuck it in a package called "conf" under src/main/java

I also created a index.html file just to make sure I can deploy the app at this point and that WebInit kicks in.

Create the programmatic Spring Application Context. I did mine under the same "conf" package and called it SpringAppContext(you can call it anything you want)


Now we have to nudge Spring at app start-up and tell it to start wiring things up - creating beans, injecting and stuff (this is very technical language...thank you!)
So we add the following magic to the programmatic web.xml(WebInit.java in my case):


At this point we redeploy to test:
Search for "testBean" in the console - should be on line indicating it was instantiated by Spring - if that is the case, life is good!

INFO: Pre-instantiating singletons in org.springframework.beans.factory.support.DefaultListableBeanFactory@7baa3dd: defining beans [org.springframework.context.annotation.internalConfigurationAnnotationProcessor,org.springframework.context.annotation.internalAutowiredAnnotationProcessor,org.springframework.context.annotation.internalRequiredAnnotationProcessor,org.springframework.context.annotation.internalCommonAnnotationProcessor,springAppContext,org.springframework.context.annotation.ConfigurationClassPostProcessor.importAwareProcessor,testBean]; root of factory hierarchy
Dec 07, 2013 8:14:47 PM org.springframework.web.context.ContextLoader initWebApplicationContext
INFO: Root WebApplicationContext: initialization completed in 423 ms

Now we do some coding

We create a Service class that would be invoked to do some work from the scheduled job


Then we create the Scheduled Job and Autowire the Service into it:


Now we just have to tell Spring where to look for "@Component"s and also that we want to do scheduling stuff,
so we add these two to our SpringAppContext.java:

@EnableScheduling
@ComponentScan(basePackages= {"app"})

"app" is just the name of my base package. For you it would be whatever package you placed your "@Component"s at.

This what the final version of the SpringAppContext.java looks like:


At this point we can deploy and test the complete web app.


And here is a zip of the project: webapp-scheduled

Hope this is useful!

Sunday, September 9, 2012

Simple Spring Quartz Web App with Maven and Eclipse

Update: 08/03/2016 - There is much easier way these days to quickly set up a scheduled process in your Java/Spring app - checkout the "@Scheduled" Spring annotation. The steps below could still be of help to you, if you are stuck with an older Spring version, which does not support the @Scheduled annotation.

1. Create a Maven Web App project with Eclipse

File -> New -> Project -> Other -> Maven Project ->


Next -> Next ->

You should be at the Select Archtype Screen.


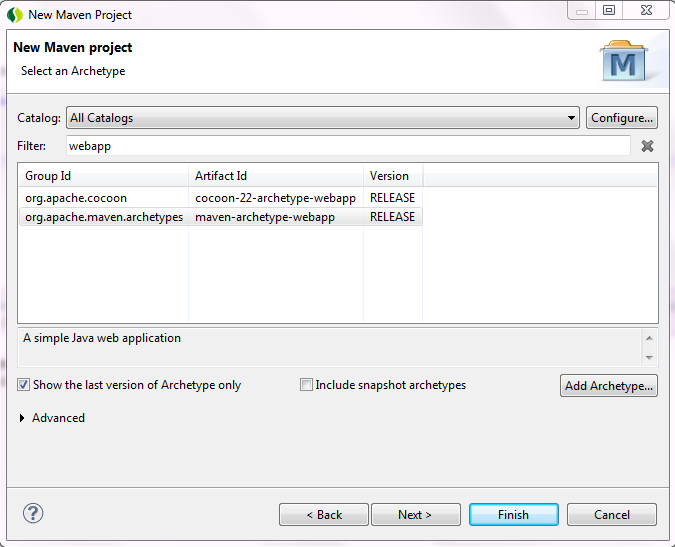
Type "webapp" (without the quotes) in the "filter" textbox.
Select the archtype with group Id: org.apache.maven.archtypes
and artifact id: maven-archtype-webapp.

Next -> Type whatever floats your boat for you Group Id and Artifact Id on the next screen:


-> Finish

2. Add needed dependencies to pom.xml. 


You are going to need all the listed dependencies, here is my pom:

<project xmlns="http://maven.apache.org/POM/4.0.0" xmlns:xsi="http://www.w3.org/2001/XMLSchema-instance"
  xsi:schemaLocation="http://maven.apache.org/POM/4.0.0 http://maven.apache.org/maven-v4_0_0.xsd">
  <modelVersion>4.0.0</modelVersion>
  <groupId>boyko</groupId>
  <artifactId>batch-example</artifactId>
  <packaging>war</packaging>
  <version>0.0.1-SNAPSHOT</version>
  <name>batch-example Maven Webapp</name>
  <url>http://maven.apache.org</url>
<dependencies>
<dependency>
<groupId>org.opensymphony.quartz</groupId>
<artifactId>quartz</artifactId>
<version>1.6.1</version>
</dependency>
<dependency>
<groupId>org.springframework</groupId>
<artifactId>spring-context</artifactId>
<version>3.1.1.RELEASE</version>
</dependency>
<dependency>
<groupId>org.springframework</groupId>
<artifactId>spring-context-support</artifactId>
<version>3.1.1.RELEASE</version>
</dependency>
<dependency>
<groupId>org.springframework</groupId>
<artifactId>spring-web</artifactId>
<version>3.1.1.RELEASE</version>
</dependency>
<dependency>
<groupId>org.springframework</groupId>
<artifactId>spring-tx</artifactId>
<version>3.1.1.RELEASE</version>
</dependency>
      <dependency>
          <groupId>commons-collections</groupId>
          <artifactId>commons-collections</artifactId>
          <version>3.2.1</version>
      </dependency>
</dependencies>
  <build>
    <finalName>batch-example</finalName>
  </build>
</project>

3. Add Spring to your web app.

Add Spring's ContextLoaderListener and the contextConfigLocation to web.xml.


This is my web.xml:

<!DOCTYPE web-app PUBLIC
 "-//Sun Microsystems, Inc.//DTD Web Application 2.3//EN"
 "http://java.sun.com/dtd/web-app_2_3.dtd" >

<web-app>
  <display-name>Archetype Created Web Application</display-name>

<context-param>
<param-name>contextConfigLocation</param-name>
<param-value>classpath:applicationContext.xml</param-value>
</context-param>

<listener>
<listener-class>org.springframework.web.context.ContextLoaderListener</listener-class>
</listener>

</web-app>

4. Create applicationContext.xml under src/main/resources

Right click on the project -> New -> Other -> XML file


5. Create src/main/java source folder

Right click on the project -> New -> Other -> Source Folder

6. Create the job

   Create a package under src/main/java
 
   Create a class that would be your Spring Batch job.


   Here is what mine looks like:
    

package boyko;

import java.text.DateFormat;
import java.text.SimpleDateFormat;

public class SampleJob {

public void sampleJobMethod() {

DateFormat dateFormat = new SimpleDateFormat("dd/MM/yyyy hh:mm:ss");

System.out.println("Invoked on " + dateFormat.format(System.currentTimeMillis()));
}
}


7. Add all needed configuration in applicationContext.xml

The final version of my specific applicationContext.xml is at the end of this section, but here are the additions step-by-step

7.1. Add the Job

<bean id="sampleJob" class="boyko.SampleJob" />

7.2. Create a Job Spring Quartz Bean and associate it with the Job and the Job method


<bean id="sampleJobBean"
class="org.springframework.scheduling.quartz.MethodInvokingJobDetailFactoryBean">
<property name="targetObject" ref="sampleJob" />
<property name="targetMethod" value="sampleJobMethod" />
</bean>

7.3. Create a trigger

<bean id="sampleJobTrigger" class="org.springframework.scheduling.quartz.SimpleTriggerBean">
<property name="jobDetail" ref="sampleJobBean" />
<property name="repeatInterval" value="10000" />
<property name="startDelay" value="3000" />
</bean>

7.4. Create a scheduler and associate it with the Job Bean and the Trigger

<bean class="org.springframework.scheduling.quartz.SchedulerFactoryBean">
<property name="jobDetails">
<list>
<ref bean="sampleJobBean" />
</list>
</property>
<property name="triggers">
<list>
<ref bean="sampleJobTrigger" />
</list>
</property>
</bean>

The numbers in trigger mean that the job will run for first time 3 seconds after app starts, then it will run every 10 seconds.

Here is the entire applicationContext.xml:

<?xml version="1.0" encoding="UTF-8"?>
<beans xmlns="http://www.springframework.org/schema/beans"
xmlns:xsi="http://www.w3.org/2001/XMLSchema-instance"
xsi:schemaLocation="http://www.springframework.org/schema/beans http://www.springframework.org/schema/beans/spring-beans-3.1.xsd">

<bean id="sampleJob" class="boyko.SampleJob" />

<bean id="sampleJobBean"
class="org.springframework.scheduling.quartz.MethodInvokingJobDetailFactoryBean">
<property name="targetObject" ref="sampleJob" />
<property name="targetMethod" value="sampleJobMethod" />
</bean>

<bean id="sampleJobTrigger" class="org.springframework.scheduling.quartz.SimpleTriggerBean">
<property name="jobDetail" ref="sampleJobBean" />
<property name="repeatInterval" value="10000" />
<property name="startDelay" value="3000" />
</bean>

<bean class="org.springframework.scheduling.quartz.SchedulerFactoryBean">
<property name="jobDetails">
<list>
<ref bean="sampleJobBean" />
</list>
</property>
<property name="triggers">
<list>
<ref bean="sampleJobTrigger" />
</list>
</property>
</bean>

</beans>

That should be that.

Run it on whatever server you prefer( I run on Tomcat 7 - right click on project -> Run On Server -> Tomcat 7) and you should see the sysouts in the console:


Attached is the sample. You could import it as an eclipse project after you unzip it and give a try on your own.

boyko-spring-batch-example

And here is an identical example which uses Cron Trigger and JobDetailBean:

boyko-cron-jobDetailBean-example


Update:12-11-2013: There's a better way to do a scheduled job these days. Use the @Scheduled annotation.